Documentation
Installing Subscriben Premium
- Download the Subscriben Premium from the link in your confirmation email, or from your account page here.
- After downloading the file, log in to your WP admin dashboard, then go to Plugins->Add New
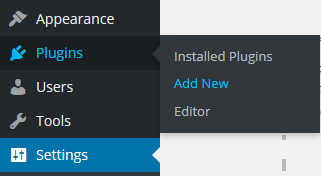
…and then press the “Upload Plugin” button near the title at the top of the page…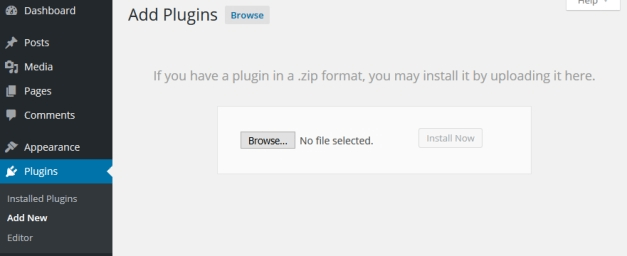
- N.B. If your web hosting is configured with a small maximum upload limit, and WordPress says that the plugin could not be uploaded because it was too big, then you can first install this plugin, which extends WordPress’s plugin uploader with the ability to handle files above the configured PHP upload limit. Alternatively, you can install it manually instead: i.e., 1) Unzip the zip file on your computer 2) Use FTP to transfer the resulting directory “subscriben-premium” into wp-content/plugins (so that it becomes wp-content/plugins/subscriben-premium).
- After the plugin has uploaded, press the link to activate Subscriben Premium.
Create a subscription product
Subscriben allows you to turn any WooCommerce product into a subscription product in a few easy steps:
1. Create or edit a WooCommerce product
2. Scroll to the ‘Product data’ section and check the ‘Subscription’ checkbox
![]()
3. Fill in the product’s subscription settings
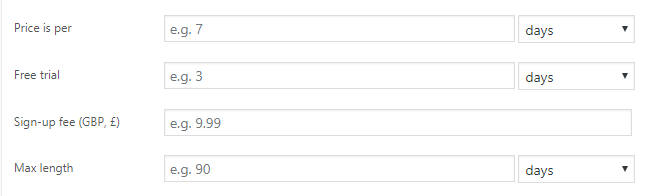
Price is per: Sets the time period for the product’s billing cycle.
Free Trial: Specifies the amount of time that your customers can subscribe to the product without being charged.
Sign-up fee: Enables a one-off fee when a customer first takes out a subscription to the product. This fee will not be applied in subsequent renewals.
Max length: Sets a maximum time frame where the customer can hold a subscription to the product. After the elapsed time, the subscription will automatically close and no further payments will be taken.
4. Publish/save the product
That’s it! Your product is now a subscription product and Subscriben will handle everything.
Manage subscription emails
Subscriben integrates with WooCommerce; so you can manage all of Subscriben’s emails the same way as you manage any WooCommerce email.
View emails
All emails can be viewed from WooCommerce > Settings > Emails
Subscriben’s emails
Subscriben adds the following new emails to WooCommerce:
Subscription new order: Sent either when a new order is generated or when a renewal order is generated.
Subscription processing order: Sent when a renewal order is set to processing.
Subscription completed order: Sent when a renewal order is set to completed.
Subscription payment reminder: Sent at predefined intervals before the payment due date, suspension date and cancellation date
Subscription payment overdue: Sent when a subscription enters an extension period or when the status is changed to overdue due to non-payment.
Subscription paused: Sent when a subscription is paused either by a shop admin or the customer.
Subscription resumed: Sent when a subscription is resumed either by a shop admin or the customer.
Subscription suspended: Sent when a subscription is suspended due to non-payment
Subscription cancelled: Sent when a subscription is cancelled either automatically or manually.
Subscription expired: Sent when the subscription has expired due to reaching its Max Length setting.
Configure emails
To configure an email go to WooCommerce > Settings > Emails

Then click the Manage button next to the email you want to configure.
Managing subscriptions
Viewing subscriptions
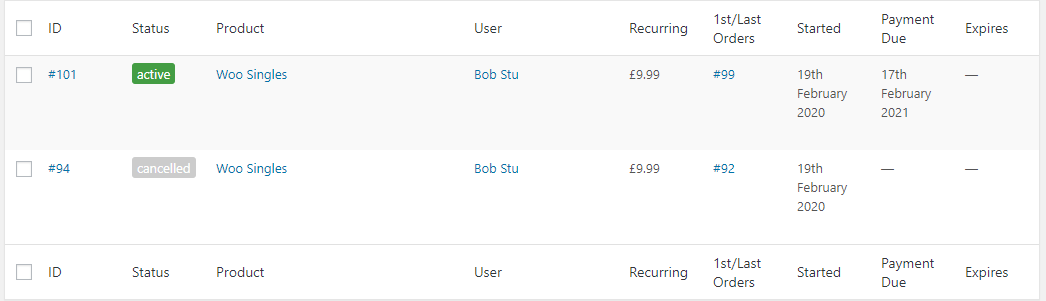
Clicking Subscriptions from the WordPress admin menu will take you to a list of all your subscriptions — including inactive ones:
Filtering subscriptions
Subscriben allows you to filter your subscription list in two primary ways: searching and preset filters.
Searching
Subscriben allows you to search your subscription list using the search box provided:

You can search your subscription list using two different types of search: free search or context search
Free search
A free search will try to find a match by searching all of the following fields: subscription ID, product name, variation ID, username and related order IDs
Context Search
Sometimes you need more precision with your searches; so using a context search allows you to state a specific field to search.
To perform a context search prepend a context keyword to your search term followed by a colon:
![]()
The following context keywords are available:
subscription: Searches the Subscription ID field
user: Searches the User ID field
name: Searches the username field
order: Searches the related orders IDs
product: Searches the product ID
variation: Searches the variation ID
Preset filters
Subscriben allows you to filter your subscription list using preset filters:

There are two preset filters to choose from: filter by date and filter by status.
Click the filter’s drop-down menu and select the filter you wish to use then press the ‘Filter’ button:
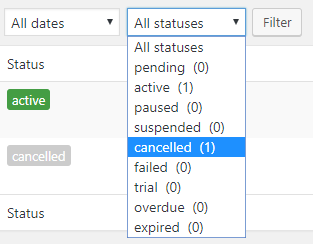
Your subscription list will now be filtered based on your selection.
Editing subscriptions
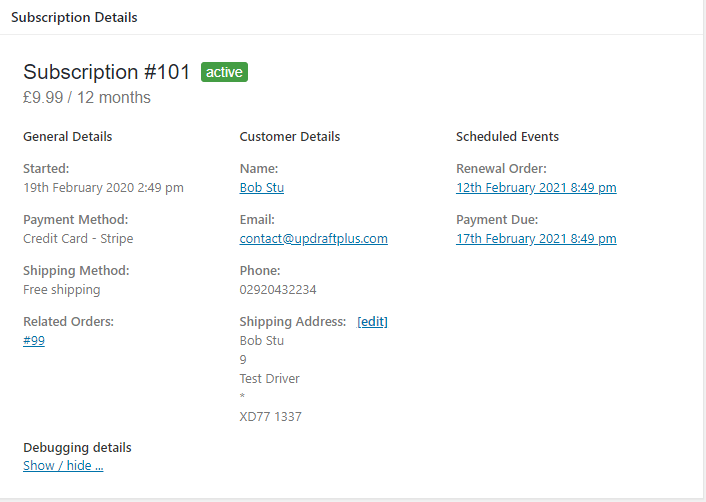
Clicking on a subscription ID will take you to the Edit Subscription page.
The edit subscription page is divided into four areas: Subscription Details, Subscription Items, Subscription Actions and Transactions.
Subscription Details
The subscription details section gives you general information about the subscription such as when the subscription was taken out, the customer attached to the subscription, the subscription’s scheduled events and more as can be seen in the screenshot:
Subscription Items
This lists all the items associated with the current subscription
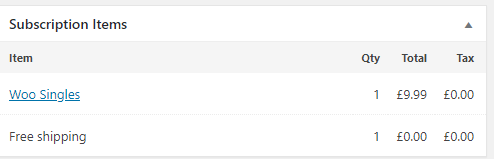
It is also possible to edit the quantity, total and tax for each item. This change will then be reflected in the next generated order.
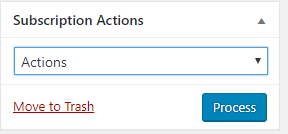
Subscription Actions
The subscription actions allows you to perform certain actions on the subscription such as pausing, resuming, cancelling and sending to trash.
Transactions
This lists all the different transactions related to this particular subscription. Different outcomes are indicated by different background colours. For example, green means success. The most recent transaction is at the top of the list.
![]()
Subscriben’s transactions
Transactions allow you to view the events and their details that have occurred within Subscriben.
View transactions
Click the Transactions menu link from Subscriben’s WordPress admin menu to view your list of transactions:
![]()
Clicking on the subscription ID, product ID or order ID will take you to the subscription, product or order edit page respectively.
Actions
An action tells you the name of the functionality that Subscriben attempted to perform.
The full range of possible actions:
- New Order: A new subscription has been created
- Payment Received: The payment has been successfully received. This also occurs when the order status has been changed to ‘processing’ or ‘completed’
- Renewal Order: A renewal order has been generated for an upcoming payment
- Suspension: An automatic subscription suspension due to non-payment
- Automatic Cancellation: An automatic subscription cancellation due to non-payment
- Manual Cancellation: The subscription has been cancelled either by the shop admin or the customer
- Order Cancellation: The order and its corresponding subscription have been cancelled
- Order Refund: The order has been refunded
- Expiration: The subscription has expired because its Max Length setting has been reached
- Payment Due: The scheduled payment is due
- Payment Reminder: A payment reminder has been sent to the customer
- Subscription Deleted: The subscription has been deleted by the shop admin
- Pausing Subscription: The subscription has been paused either by the shop admin or the customer
- Resuming Subscription: The subscription has been resumed either by the shop admin or the customer
- Address Changed: The shipping address has been updated either by the shop admin or the customer
- Scheduled Date Change: Either the subscription’s renewal or the payment date has been changed
Results
The result lets you know the outcome of the performed action.
The full range of possible results:
- Success: The action successfully completed.
- Error: An error occurred whilst processing the action.
- Processing: The action is still being performed. Something may have gone wrong if the transaction stays in this state for longer than 30 seconds.
- Failed: An action that failed to complete but did not error. For example, insufficient funds for a recurring payment.
Customise transactions table
Subscriben allows you to customise your transaction list. You can show or hide table columns and change the number of items shown per page.
Showing or Hiding columns
Subscriben allows you to show or hide columns from your transactions list. For example, you can remove the ‘Product’ column. By default Subscriben shows all available columns.
To show or a hide a column:
1) Click ‘Screen Options’
2) Uncheck the columns you wish to remove or check the columns you wish to show
![]()
3) Click ‘Apply’
Change items per page
To change the amount of transactions per page shown:
1) Click ‘Screen Options’
2) Increase or decrease ‘Number of items per page’
![]()
3) Click ‘Apply’
Filtering transactions
Subscriben allows you to filter your transactions in two ways: searching or preset filters.
Searching
Subscriben allows you to search your transaction list using the search box provided:
![]()
You can search your transaction list using two different types of search: free search or context search
Free search
A free search will try to find a match by searching all of the following fields: subscription ID, product ID, variation ID and order ID
Context Search
Sometimes you need more precision with your searches; so using a context search allows you to state a specific field to search.
To perform a context search prepend a context keyword to your search term followed by a colon:
![]()
The following context keywords are available:
- Subscription: Searches the subscription IDs
- Product: Searches the product IDs
- Variation: Searches the variation IDs
- Order: Searches the order IDs
Preset filters
Subscriben allows you to filter your transactions using preset filters:
![]()
Using Subscriben’s preset filters you can filter your transactions by date, by action and by result.
Click the filter’s drop-down menu and select the filter you wish to use then press the ‘Filter’ button:
![]()
Your transaction list will now be filtered based on your selection.
Subscriben’s settings
Clicking Settings from Subscriben’s WordPress admin menu allows you to control the behaviour of Subscriben.
The settings are split into four sections: General, Capabilities, Flow and Gateways
General

Add To Cart button label: This allows you to overwrite the ‘add to cart’ button text for subscription products
Enable multi-product subscriptions: Attempts to combine multiple products into one subscription instead of one subscription per product

Cheapest product is one with: Allows you to control how the cheapest product is calculated.
Product sale price applies to: Allows you to control when the product’s sale price is applied. You could give users the the discounted price only when first taking out the subscription or allow them to keep the discount price for each renewal too.
Charge shipping for renewal orders: Allows you to apply the shipping price when a subscription is being renewed. Useful for physical subscriptions like a magazine.

Subscription limit: Limits the amount of subscriptions a customer can have.
- One active subscription of specific product per customer: Limits the customer to having only one subscription per product. For example, the customer couldn’t have two active subscriptions to the same magazine. But could have an active subscription to one magazine and another active subscription to a different magazine.
- One active subscription per customer: Limits the customer to having only one active subscription to your subscription products at a time.
Trial limit: Limits the amount of trials a customer can have.
- One trial per product per customer: Limits the customer to only having one trial per product. For example, the customer could have a trial to a particular magazine and software product at the same time. But wouldn’t be allowed any further trials for those particular products.
- One trial per site per customer: Limits the customer to trialling only one of your subscription products.
Capabilities
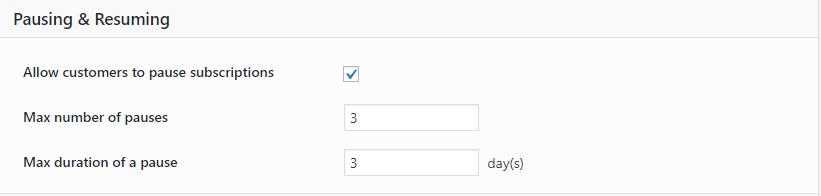
Allow customers to pause subscriptions: Gives your customers the ability to manually pause and resume their subscriptions. They can pause and resume their subscriptions via their ‘My Account’ page.
Max number of pauses: Your customers’ quota for how many times they are allowed to pause their subscriptions.
Max duration of a pause: Limits the length of a subscription’s pause before automatically resuming.

Allow customers to cancel subscriptions: Gives your customers the ability to manually cancel their subscriptions. They can cancel their subscriptions via their ‘My Account’ page.
Flow
At the top of the flow section, you can find a graphical overview of Subscriben’s workflow:
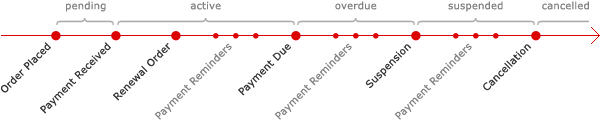
Payment reminders, overdue periods and suspensions are all optional.

Generate renewal orders: How many days before the ‘Payment Due’ date renewal orders will be generated. This needs to be shorter than any billing cycle and trial length.

Enable payment reminders: Enable or disable whether payment reminders are sent to your customers.
Send reminders before: How many days prior to payment due, suspension or cancellation events should payment reminders be sent. Separate multiple days by a comma.

Enable overdue period: Enable or disable an overdue period.
Overdue period length: Determines the overdue period’s length. The subscription will either be automatically suspended or cancelled after the overdue period.

Enable suspensions: Enables or disables a suspension period.
Suspension period length: Determines the suspension period’s length.
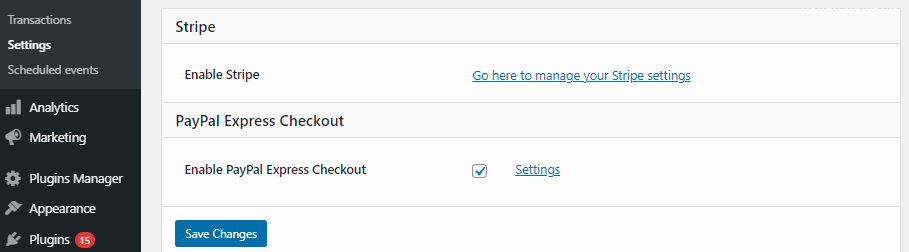
Gateways
Subscriben comes with two gateways out of the box: Stripe and Paypal express checkout
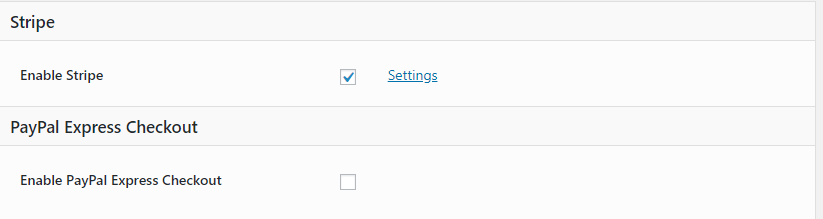
Enable Stripe: Enable or disable Stripe as a payment gateway.
Enable PayPal Express Checkout: Enable or disable Paypal express checkout.
You can configure the settings for each gateway by clicking the ‘Settings’ link.
Subscriben’s scheduled events
Clicking Scheduled Events from Subscriben’s WordPress admin menu bar gives you an overview of all of Subscriben’s upcoming events. This is principally used as a debugging aid.

The table has three columns:
- Time: This gives you the date and time for when the scheduled event will run. You can also see the precise number of days, hours, minutes and seconds before it’s due to run.
- Subscription: The ID of the subscription associated with the event. Clicking the ID will take you to the ‘Edit subscription’ page.
- Event: The type of event that will run.
Product and Checkout page
Subscriben makes several changes to the product page and checkout page. The changes indicate that a subscription is being purchased and give customers pertinent information about the subscription such as the billing cycle and setup fees.
An example of a product page changed by Subscriben:

On the above screenshot, you can see that not only does it display its regular price (£9.99) but it tells you how often that price is to be paid (every 12 months) and the cost of the sign-up fee (£4.99).
Here’s what the same product looks like at the checkout:

You can see the same information from the product page in the ‘Price’ column.
In the ‘Subtotal’ column you can see the total amount that is to be paid now (£14.98), the cost of each recurring payment (£9.99) and how often the recurring payment will be made (every 12 months).
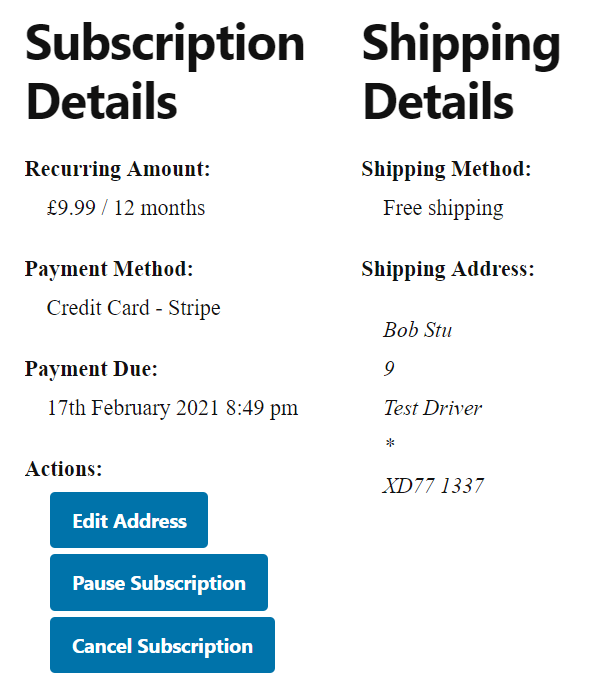
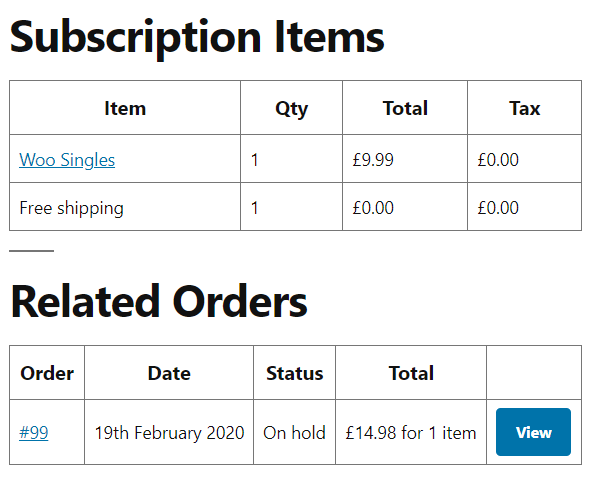
My Account page
Subscriben allows you to manage your subscriptions from WooCommerce’s ‘My Account’ page:
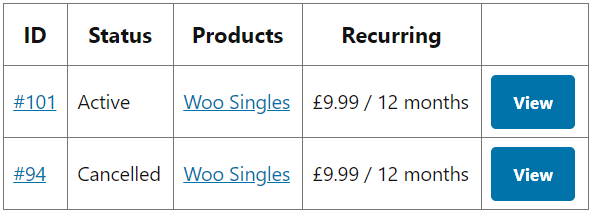
Clicking on the ‘View’ button or the ‘Subscription ID’ will take you to the ‘View Subscription’ page.
From the ‘View Subscription’ page, your customers are able to pause, resume or cancel their subscription from this area if permitted in the settings.
They can also update the subscription’s shipping address and view the subscription’s general details. They will also find the list of products that are included in the subscription and any related orders.
Setting up the PayPal payment gateway
Step 1: Enable Reference Transactions on the PayPal account
To activate reference transactions on your PayPal account, contact PayPal support and ask for “reference transactions” to be enabled. This will allow your PayPal account to accept automatic payments from your customers. Once you get through to a human member of the support team, be sure to note that you are requesting the activation of “reference transactions”, NOT subscriptions or recurring payments. This can be a common error as they sound very similar, but are for different PayPal functions.
Please be aware that there are eligibility requirements that need to be met for your account to enable reference transactions. PayPal does not disclose what these are, but as a general rule you need to have an established PayPal account that is considered trustworthy, with a positive rating and regular transactions.
During the setup process, PayPal may ask you for further information about your business and your need for reference transactions. Typically the response to the query when setting up Subscriben should be along the lines of ‘I am selling subscriptions on my site using the WooCommerce extension Subscriben. Subscriben uses reference transactions to create automatic subscription payments for goods/services.’
Once evaluated by PayPal, you will be given an activated/not activated reference transaction outcome. If PayPal decline to enable the feature, you will unfortunately not be able to enable automatic billing via PayPal. Enabling reference transactions may also incur a monthly fee to PayPal.
After reference transactions are enabled on your account, login to your PayPal manager and go to Account Administration→Transaction Settings and set ‘Allow Reference Transactions’ to ‘yes’
For more information on setting up reference transactions, please see this PayPal guide.
Step 2: Once reference transactions are enabled, you will need to enable the correct payment gateway
Go to the following area in your WordPress dashboard.
Admin→Subscriptions→Settings→Gateways, Enable PayPal Express Checkout
Next, follow the link to the gateway settings
Step 3: You will then need to supply API credentials for the gateway
 You can set up several different types of PayPal API credentials. The type needed for this type of gateway are NVP/SOAP API signatures.
Full instructions to generate these credentials can be found here
Step 4: Once you have generated the credentials, enter the API Username, Password and Signature into the gateway settings
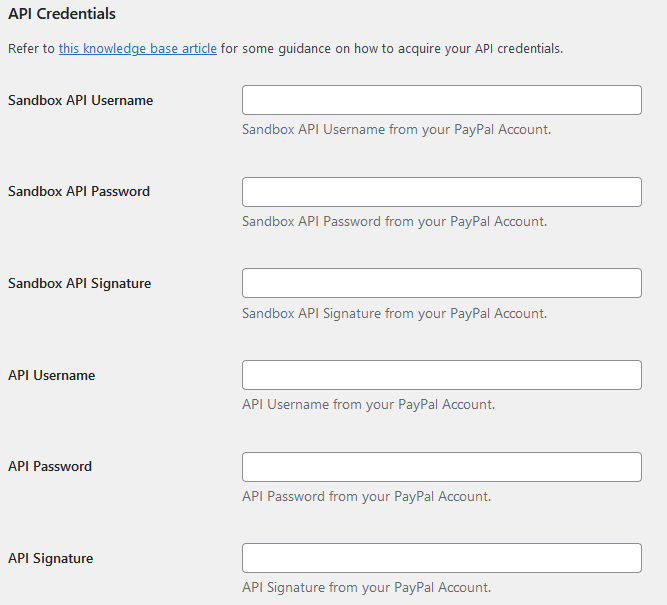
When setting up your API Username, API Password and API Signature, remember that these are different depending on if you are using a live or sandbox website. Be sure to enter the correct API information depending on what type of site you are setting up.
Please note, you do not need to set an ‘appID’ for this gateway.